
A small kitchen doesn’t have to mean a chaotic one. Whether you’re working with a compact apartment galley, a cozy studio setup, or a modest family home, the way you organize your kitchen has a direct impact on how you cook, how quickly you can find things, and frankly, how much you enjoy being in that space. The good news? You don’t need to knock down walls or spend a fortune on a renovation. What you do need is a smart system — and that’s exactly what this guide delivers.
From professional chefs to home cooks, the best kitchens in the world share one trait: everything has a place, and every inch is intentional. In this guide, you’ll find step-by-step strategies for how to organize a small kitchen, with practical storage ideas that are easy to implement, budget-friendly, and built to last. Let’s get started.
Why Kitchen Organization Matters More Than You Think
Before diving into solutions, let’s talk about why this matters beyond aesthetics. According to Good Housekeeping, a disorganized kitchen doesn’t just look messy — it actively slows you down, leads to food waste, and increases daily stress levels. When you can’t find your tools, you skip cooking at home and reach for takeout instead. When your pantry is chaotic, you overbuy items you already own.
An organized kitchen, on the other hand, makes meal prep faster and more enjoyable, reduces food waste, and gives even the smallest space a sense of calm and control. Organization is not a luxury — it’s a functional necessity.
Step 1 — Declutter Before You Organize Anything
This is the rule that most people skip, and it’s the reason their organizing efforts don’t stick. You cannot organize clutter. Before you buy a single storage bin or shelf riser, you need to pull everything out of your kitchen and make honest decisions.
Go through every cabinet, drawer, and countertop and ask yourself three questions about each item:
- Do I use this at least once a month?
- Do I have a duplicate of this?
- Does this belong in the kitchen, or somewhere else entirely?
Be ruthless. That third mandoline you never use, the stack of mismatched containers missing their lids, the novelty appliance you bought once and forgot about — all of it needs to go. Donate what’s in good condition, and discard the rest. According to Real Simple, most households eliminate 30–40% of their kitchen items during a proper declutter session. That alone will change how your kitchen feels.
Step 2 — Zone Your Kitchen Like a Professional
Professional kitchens operate on a concept called station or zone cooking — where every tool, ingredient, and appliance lives close to where it’s actually used. You can apply the exact same logic at home, regardless of kitchen size.
Divide your kitchen into three core zones:
The Cooking Zone
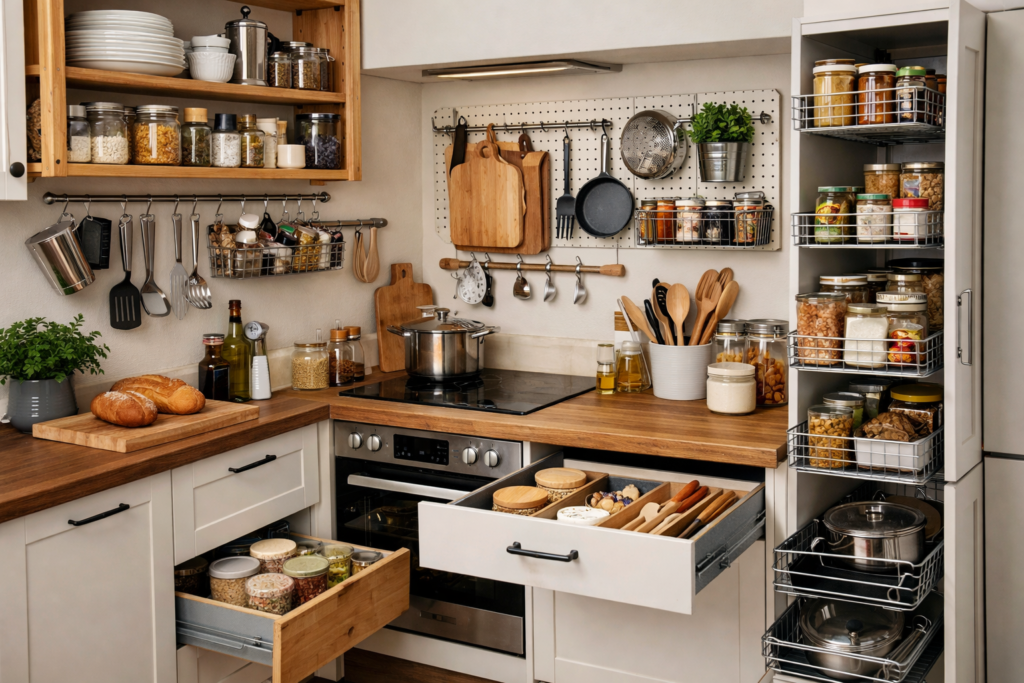
Everything you need while actively cooking belongs near your stove: pots, pans, spatulas, wooden spoons, cooking oils, salt, pepper, and your most-used spices. Mount a magnetic spice rack on the wall or keep a small spice organizer right next to the stove. Your knife storage should also live here, ideally on a magnetic strip mounted to the wall to free up counter and drawer space.
The Prep Zone
Your cutting boards, peelers, graters, mixing bowls, and measuring cups should all live near your primary prep surface — usually a section of counter away from the stove. If you have limited counter space, a foldable cutting board that fits over your sink can double your prep area instantly.
The Storage Zone
Dry goods, canned foods, baking supplies, and bulk ingredients belong in your pantry or designated cabinet — grouped by category so you can see exactly what you have at a glance. We’ll cover this in more detail below.
Step 3 — Go Vertical: Use Every Inch of Wall and Cabinet Height
In a small kitchen, your most underused real estate is vertical space. Most people think only about the footprint of their kitchen, but the walls, the tops of cabinets, and the space between shelves are all fair game.
Here’s how to put vertical space to work:
- Wall-mounted pegboards or rails: Hang pots, pans, utensils, and even small shelves on a pegboard above your counter or near your stove. This single upgrade can clear out two or three full drawers.
- Stackable shelf risers inside cabinets: These simple risers double the usable shelf space in any cabinet, letting you store plates on top and mugs underneath — or stack canned goods two layers deep.
- Over-the-door organizers: The backs of pantry doors and cabinet doors are prime storage space that almost everyone ignores. Slim over-door racks hold spices, foil and wrap rolls, cleaning supplies, or snacks.
- Hooks under shelves: Small adhesive hooks mounted under shelves can hold mugs, measuring cups, or small colanders without taking up any shelf space.
The team at The Kitchn recommends treating your kitchen walls “like a fifth storage surface” — and once you start thinking that way, small kitchens start to feel surprisingly spacious.
Step 4 — Tackle Cabinets and Drawers with Intention
Cabinets and drawers are where small kitchen organization either thrives or falls apart. The problem isn’t usually a lack of space — it’s that items are stored randomly without a logical system.
For cabinets, group like with like. All baking supplies in one cabinet, all food storage containers in another, all serving dishes in a third. Use adjustable shelf dividers to customize heights based on what you’re storing. Turntable organizers (lazy Susans) are especially effective for corner cabinets or deep shelves — they let you rotate items to the front instead of digging to the back.
For drawers, invest in expandable drawer dividers. These are inexpensive and transform a chaotic utensil drawer into a tidy, functional one within minutes. Dedicate one drawer exclusively to cooking tools, one to miscellaneous gadgets, and one to wraps, bags, and foil. Check out some of the best compact kitchen gadgets that don’t eat up precious drawer space.
Step 5 — Pantry and Dry Goods Storage Done Right
Even if you don’t have a dedicated pantry, the principle still applies: your dry goods, canned foods, and baking ingredients need a consistent home, grouped logically, and visible at a glance.
The single biggest pantry organization upgrade you can make is switching to uniform, airtight containers for dry goods like flour, sugar, pasta, rice, oats, and cereals. Clear containers let you see what you have without opening anything, maintain freshness far longer than open bags, and stack neatly. Label every container — even if you think you’ll remember what’s inside.
Organize your pantry shelves by frequency of use. Items you reach for daily (olive oil, pasta, canned tomatoes) belong at eye level. Rarely used items go on upper or lower shelves. Group categories together: grains, legumes, baking goods, snacks, canned goods. A well-organized pantry according to Better Homes & Gardens can save the average household up to $1,000 a year in reduced food waste alone.
Step 6 — The Golden Rule of Countertops
Here’s a rule that professional kitchen organizers live by: your countertop is not storage. It is a workspace. The only items that belong on your counter are those you use every single day — a coffee maker, a toaster, a knife block, and perhaps a fruit bowl. Everything else should have a home elsewhere.
Countertop clutter is the fastest way to make a small kitchen feel smaller. It also makes cooking harder — you end up with less surface area to prep on, and more things to move around every time you cook. The discipline of keeping counters clear is one of the highest-leverage habits you can build in your kitchen.
Step 7 — Inside Cabinet Doors Are Prime Real Estate
This is one of the most underused storage zones in any kitchen. The inside of your cabinet doors — especially under the sink — can hold a surprising amount when you add the right organizers.
Adhesive hooks on the inside of your pot cabinet door can hold pot lids upright, freeing up the shelf space below. A mounted spice rack on the inside of your pantry door adds a full tier of spice storage without taking up any shelf space. Cleaning supply organizers mounted inside your under-sink door keep products accessible but hidden. Small tension rods mounted horizontally inside cabinets can also hold spray bottles vertically, a clever trick for maximizing under-sink storage.
Maintenance — How to Keep It Organized Long-Term
Getting organized is satisfying. Staying organized is the real skill. The key is building simple habits that make maintaining your system automatic rather than effortful.
- One in, one out rule: Every time you bring a new kitchen item home, an old one leaves. This prevents slow re-accumulation of clutter.
- Sunday reset: Spend five to ten minutes each week returning items to their proper place, wiping down shelves, and checking your pantry for anything that needs to be used up.
- Grocery shop with a list: Knowing exactly what you have prevents duplicates from creeping back in.
- Annual deep declutter: Once a year, repeat the full declutter process from Step 1 to catch anything that has crept back in.
For more ideas on building efficient kitchen habits, explore our guide on smart kitchen cleaning hacks that save time and energy every day.
Frequently Asked Questions
What is the most important first step to organizing a small kitchen?
Decluttering. Before adding any storage solutions, remove everything from your kitchen and only keep what you genuinely use. Organizing clutter just moves the problem — it doesn’t solve it.
How do I organize a kitchen with very limited cabinet space?
Go vertical. Use wall-mounted pegboards, over-door organizers, stackable shelf risers, and hooks under shelves to multiply your usable space without adding floor or counter footprint.
How do I organize kitchen drawers effectively?
Use expandable drawer dividers to group similar items together. Dedicate each drawer to one category: utensils, gadgets, or wraps and storage bags. Avoid the temptation to mix categories.
What should I always keep on my kitchen counter?
Only daily-use items: a coffee maker, toaster, knife block, and a fruit bowl if needed. Everything else should be stored to keep countertops as clear and functional as possible.
How often should I reorganize my kitchen?
Do a full reorganization once a year, a light pantry check monthly, and a quick 5-minute counter and shelf reset weekly. Consistency is far more effective than occasional big overhauls.
Conclusion
Organizing a small kitchen isn’t about having the perfect space — it’s about using the space you have with intention. By decluttering first, zoning thoughtfully, using vertical space, and building simple maintenance habits, even the most compact kitchen can become a smooth, enjoyable cooking environment. Start with one step today, and you’ll be amazed at how quickly the whole space transforms. A well-organized kitchen isn’t just easier to cook in — it’s genuinely a pleasure to spend time in.
Leave a Reply